As more retail stores sell lower cost video surveillance cameras, the level of expertise given to the customer is waning leading to almost pointless protection.
A lot of low cost surveillance cameras have integrated infrared (IR) lighting positioned in a ring surrounding the lens, which probably sounds like a great approach because these cameras can see at nighttime.
In fact some have a specification of zero lux. While it is true that they will work in complete darkness (0 lux), what is actually not mentioned is at what range.
At around six feet the brightness is really so intense that elements on the sides of the image can be saturated.
The very same would happen to someone standing directly in front of the camera.
Within a couple of meters of this, we have minimal light, causing the surveillance camera to not provide a good even contrast across the image.
IR lighting is a fantastic product to the surveillance sector as it permits a camera to view in total darkness as though it was day time.
I’ve been inside rooms where I was not even about to walk for the fear of falling in the darkness but the camera could see clearly.
This is utilizing a decent grade of surveillance camera and infrared light source. If you ask me, most lower cost surveillance cameras only have infrared coverage for a couple of meters and give a grainy result outside of the IR spot.
Superior outcomes are possible using a reflected or indirect IR source of light as I will explain next.
A few clarifications related to IR illumination.
For Infrared to be useful to a camera, you require the camera to operate in black and white mode. A lot of the lower priced cameras claim to do this but are in fact always in color setting.
They just shut off the part of the video that makes the color, referred to as the color burst.
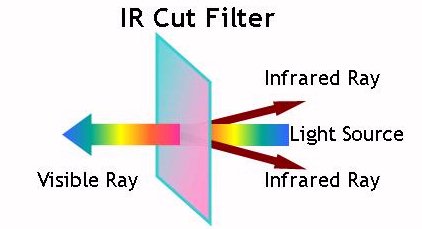
The proper day/night camera contains something called an IR cut or sweep filter, which in the daytime removes all infra red light from striking the CCD or CMOS sensor.
Exactly why might you want to do this?
Because IR light mixed with color light will cause a couple of challenges. The first is hot objects show up grey as they are giving off infrared energy.
So a black path in the hot months looks greyish. And the second happens because white or visible light has a different wavelength to IR, they have to be focused differently on to the image sensor, causing the scene not being well-defined.
This is documented in an excellent book about video surveillance, titled ‘CCTV’ by Vlado Damjanovski.
IR Light isn’t visible to the human eye when cast on a surface. However a number of illuminators do give off a dull red glow if you look straight at them.
These are working in the 840-880nm wavelength (Defined by the LED device you select), and that is on the higher edge of what the eye is able to see.
If you are using IR LED’s in higher wavelengths around 940nm, no visible light is visible but not all cameras are as sensitive to this range.
How to use Infrared illumination with out causing hot spots within your picture.
The right solution is not to go with a low-cost IR illuminator but I know that quite a few of our subscribers are in the cost sensitive end of the marketplace.
However, for interest sakes, a good quality illuminator much like those installed inside of prisons can be located from suppliers such as Raytec and Microlight, that have some terrific guidance on their web sites. Several low priced products such as the IR-130 & IR-110 will give acceptable outcomes while following my suggestions below.
The easiest way to prevent any hot spot from a budget IR illuminator is do not point it straight at what you would like to see. More advanced illuminators spread the light more uniformly and also over a wider area so may be pointed directly on the scene while not creating a hot spot.
Instead make use of reflected light by means of an adjoining surface area such as a wall or ceiling. By using an IR lamp separate to the camera and shining it on a 47 degrees in the direction of the ceiling or off from an adjacent wall structure deflects the light far more evenly over the camera scene but it does decrease the distance of coverage.
I have seen this method extensively in smaller areas as well as prison cells but nearly as good results are obtainable externally or in halls where there is often a surface area adjacent to the camera.
Essentially any surface area besides where the camera is covering works. Shining a touch will give a good indication of the angle to work from, bearing in mind that the camera does not need much IR light to perform reasonably well.
Note that the Infrared light need not be near the camera either. If the camera is looking at an object 10 metres away, place the illuminator closer to the area so a larger level of light is thrown where it’s required.
Light brightness has the inverse square law applied to it as detailed in the previously referred to CCTV book. In simple terms, when the illuminator is 10 metres away from the item being covered with the camera, it will provide the light as it will when installed five meters away.